IFI Micro iTube 2 Buffer & Preamp Review

IFI-Audio Micro iTube 2 Pros&Cons
Pros
- Price-point
- Doesn’t drastically add colouration
- Added functions (bass boost, 3D+)
- Very useful as a preamp
Cons
- Perhaps not “tubey” enough for some people
IFI-Audio Micro iTube 2 Specs
- Output Power: >7.75V
- SNR: >119dB
- THD+N: <0.009%
- Vacuum Tube: 1x NOS GE 5670
Packaging
The packaging for the iTube 2 is quintessentially IFI. seriously, pretty much all of the boxes look identical. This isn’t necessarily a bad thing, as a stream-lined and consistent look in packaging adds to brand recognition.
It’s not a particularly fancy type of packaging, but it does the job well whilst still remaining pretty much as compact as possible.
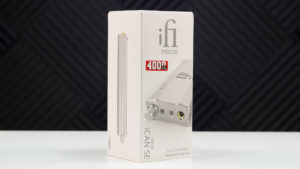

Removing the outer printed-sleeve reveals an almost all-white box, only bearing the IFI logo. Lifting up the lid reveals the star of the show.
The iTube 2 takes centre stage here, being proudly displayed in an otherwise minimalistic packaging.
Underneath the iTube 2 lies the included 15V iPower power supply, and another box containing a few extra parts.
What’s in the box?
- IFI Micro iTube 2
- 15V iPower
- Stereo RCA interconnect
- Right-angled adapter for power supply
- Dip switch tool
- 4x silicon feet
- Instruction leaflet(s)
Accessories
IFI really didn’t include much in terms of extras. there’s no case/storage pouch, no silicone spacer pad, and no stacking bands. But, this isn’t an issue, seeing as the iTube 2 isn’t a portable device. What we do get, is pretty much everything you actually would need. Of course, every electronic device needs power, and here IFI spared no cost in including the 15V of their iPower power supply. There’s also an included right-angle attachment for the power supply jack, which proves to be quite useful if you’ve got OCD.
We also get the usual 45cm (excluding connectors) stereo RCA interconnect cable which is included with pretty much all of IFI’s DACs and AMPs.
The 4 silicon feet are also a great addition, as that’ll prohibit your brand-spanking-new toy from getting scratched if it’s slid around on a desk or other hard surface.
And finally we also get a little plastic tool which is used only to ease the task of flipping the dip switches on the underside of the iTube 2.

Design
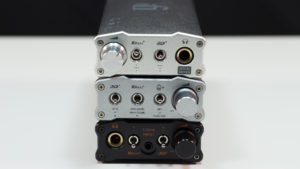
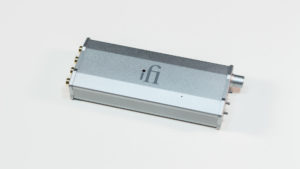
Ok, so right off the bat, the iTube 2 looks pretty much identical to every other device in IFI’s Micro lineup. The dimensions are all the same, which makes for a very nice-looking stack if you own a few of their Micro devices. Of course, the more recognisable differences are the number of switches on the back, as well as the colour.
The iCAN SE has a pretty bright silver finish, whereas the iTube 2 has a more subdued and arguably nicer looking silver colour. It’s closer perhaps to a sort of metallic neutral grey, rather than a shiny silver.
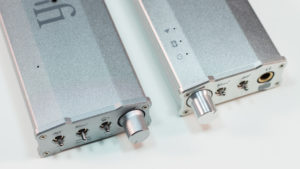

Stacking the Micro iDSD Black Label, iTube 2 and iCan SE looks pretty sweet!

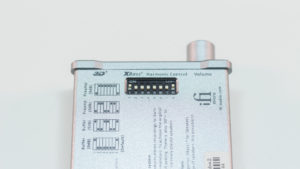
The first of the 3 toggle switches has 3 positions to alter the iTube 2’s 3D+ feature. The middle position is the off position, whilst flipping the switch downwards will engage the + setting. IFI describes the + setting as “this matrix recreates the original ‘width’ of the soundstage and is the recommended DEFAULT setting”. On the other hand, flipping the switch to the top position engages the 30°+ circuitry, which IFI says “this matrix adds an extra 30° to redress the narrow placement of speakers (eg either side of a PC monitor).
Then we move on to the second switch, which deals with the XBass+ feature. This switch too has 3 positions. Starting from the bottom-most position this time is the off position, whilst the middle position adds 12dB of bass boost which IFI says is “for speakers missing some bass notes (below 80Hz)”, and lastly is the top-most position which only adds 6dB of bass boost and is intended “for speakers missing only the lowest bass notes (below 40Hz)”.
You’ll notice that IFI specifically puts an emphasis on the use of the iTube 2 with speakers, rather than headphones. Whilst the device certainly can be used with headphones, some of the functions and/or features are indeed more appropriate for speakers.
Finally we get to the last switch which is arguably the star of the show – the “Tube+” switch. No, this switch doesn’t select between different tubes, but rather between different tube sound signatures…or at least what IFI describes as being the equivalent of different tube driven topologies.
The middle position selects the default setting which “produces a sound parallel to classic, low-distortion tube-based studio equipment”.
Switching to the bottom-most position enables the Push-Pull setting which is meant to engage “the sound signature of a Push-Pull tube amplifier”, and lastly the upper-most position is labeled as “Set” which IFI describes as “the sound signature of a Single-Ended Triode amplifier.”
Read: Chord Electronics Hugo 2 DAC/AMP Review
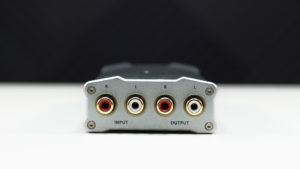
Moving onto the rear of the iTube 2, we find only 2 pairs of stereo RCA connections. These merely function as standard input and output jacks. You’ll notice that there is no power-jack on the rear, as this item has been delegated to the right-hand side of the device.
Perhaps this was done to keep the form factor if the iTube 2 identical to the rest of the Micro lineup, but having the power-cord sticking out form the side of the device isn’t a particularly neat look. It’s for this reason that IFI included the right-angle adapter, which does alleviate the effect of this eye-sore a bit.
The iTube 2 is intended to be used as either a buffer or preamp, and the dip switches are used to select between these different modes.
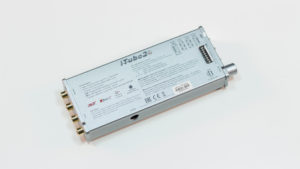
The last design elements to cover would be with what IFI had done on the very top panel of the iTube 2. As mentioned before, the iTube 2’s housing is pretty much identical to the rest of the Micro line, but IFI was rather clever this time round.
You see, part of the charm of tube amps is seeing the tubes glow, but of course, in the case of the iTube 2, the tube is entirely encased within the housing. So here, IFI went ahead and used the tittle (dot above the i) within the IFI logo to allow the tube’s glow to shine through.
And, since this is a tube-driven product, that does mean that the tube needs to warm up before it can be used. For this, IFI added a little LED to indicate when the iTube 2 is ready to use. When you first turn it on the LED is red, and after a while (depending on initial temperature, it can take up to a minute) the LED turns yellow.
The last point to take into consideration is, because the iTube 2 is a very compact product and the tube is entirely encased, the device can get quite hot. Of course this is going to depend on how long it’s powered-on for and how hard it’s driven. So, it’s probably best to turn it off when not in use.
Sound
OK, first a quick disclaimer – this is my first experience with a tube-based product.
Well, as far as I know anyways. As such, I genuinely have no real idea of what the “tube sound” is supposed to be.
However, I’ve also been in the world of Hi-Fi audio and dealt with various forum posts long enough to know that, most of the time, experiences and descriptions of relative differences between gear are (more often than not) exaggerated quite a bit.
So, with that being said, how does the iTube 2 perform? Well, in comparing the sound I connected the iTube 2’s input to the 3.5mm lineout of a Shanling M2s (set to lineout, of course), and then the output of the iTube 2 was sent to a Fiio A3, and then eventually that was connected to an A/B switch. On the other side of the A/B switch was another M2s which fed a lineout signal to another A3 which was volume-matched to the output level of the first A3. We’ll call this the reference system. This ensured that the only variable being tested was the effect the iTube 2 had on the signal path.
After setting up the A/B rig it was time to get to business. As the iTube 2 has 3 different settings for its “Tube+” feature, it’s only appropriate to test out each one. Whilst flipping the switches, a change in the sound was hear, however, it turned out that it would be impossible to directly compare each different setting against the other, as each changed the volume level of the output. If the volume changes, that renders the test unreliable. So it’s unclear how much of the “change” in sonic character could be attributed to the different effects engaged, and how much was due to a change in volume level.
First up was the “SET” position. Compared to the reference system, the iTube 2 provided a slightly deeper soundstage and gave a bit warmer overall tonality. Instruments and vocals also just seemed to sound that little bit more natural, which made the reference setup sound flatter in comparison. Flatter as in “not as engaging”, rather than in terms of frequency response.
The second setting is “Classic”. Here it sounded as though the notes had had a slightly longer decay, which gave the illusion of a more holographic sonic presentation.
The last position is the “Push-Pull” setting. This was arguably my favourite,as it seemed to change the sound in a more pronounced and enjoyable manner than the other 2 settings. Compared to the reference system, the Push-Pull setting made things sound just a hair more bassy and added some warmth too. The soundstage also seemed to gain some width.
Overall the differences are genuinely very subtle (in the grand scheme of things), and even IFI have stated that there simply is no right or wrong setting, but it’s all up to personal preference.
So why is it that I did not hear as large a difference as all those forum posts would suggest? Well, for one, they’re forum posts….remember our little chat earlier about exaggerated claims?
But another reason could very well be that, because the iTube 2 is a hybrid system rather than a full-on tube preamplifier, perhaps it’s not doing the “tube sound” any real justice. Or perhaps having tubes at the output stage (just before the headphones/speakers) would yield a larger, more noticeable difference than what a preamp would. Who knows?
But if I had to describe the sonic change, it would be this: Vaseline on the lens.

The purpose of this was to give a slightly hazy, but “dreamy” look. The same effect is done digitally on many modern mobile phones, in particular with the front-facing camera. It’s intended to soften the image, which in turn makes skin flaws less noticeable. Think of it like digital makeup.
And that’s what I’d say the iTube 2 does to the sound…it “beautifies” it. It outputs what is arguably a less accurate signal than the one being fed to it – but if it creates a subjectively more pleasing sound, who cares?

Value
So, how do we judge the value of such an item when its “benefits” are actually rather small? Well, that depends on your needs.
If you’re looking for a rather compact tube preamp, then the iTube 2 could make perfect sense to you. Or, perhaps you need a preamp, but would also like to dip your toes into the world of tubes….in which case the iTube 2 could very well sit towards the top of your list.
But taking the entire system into account, the iTube 2 would perhaps be the last product to get. The speakers / headphones, followed by the DAC/AMP will have a much larger impact on the final sound than what this preamp will. But once you’ve got the important ones nailed down, then sure, the iTube 2 certainly does seem like a very decent product, one that may add just enough flavour to the sound to satisfy your needs. But what sweetens the deal with the iTube 2 are the added features. Not only does it give you 3 different sound signatures, but throw in the various bass boosts and 3D+ effects, and what you’ve got is actually quite a nice addition to your system.
Rating
The TECH MERIT rating system is designed to take as many aspects of the device into account as possible. As such, we have a basic rating, as well as a final rating. The basic rating rates the product purely as a high quality portable audio device, and is generally a good indicator of how it stacks up to its rivals in terms of standard features and specs. The final rating, however, grants bonus points for any extra features and specs that aren’t quite as common, and is a great way to judge the product as a complete package.
Packaging
Look and feel: 8 / 10
Included Accessories
Protective case: –
Cables: YES
Build
Quality control: 10 / 10
Seems durable: YES
Use of metal: YES
Sound
Sound stage: 9 / 10
Detail retrieval: 9 / 10
Sibilance: 10 / 10
Instrument separation: 9 / 10
Neutrality of sound signature: 9 / 10
Value
Competitive price-point: YES
Relative value: 8 / 10
Basic Rating: 9.4
Bonus points
Has a screen: –
Ability to EQ: –
Bass boost: YES
Various digital filters: YES
Number of cables included: 1
Number of gain positions: 4
Fast charging: –
How premium the case feels: –
Bluetooth: –
Apt-X: –
Premium look and feel of the device: 8 / 10
Number of digital connections: –
Number of analogue connections: 1
Power adapter included: –
Balanced output: YES
WiFi: –
Dual DAC setup: –
Premium DAC chip(s) used: YES
Plays DSD: YES
Plays 32-bit: YES
Wireless connection quality: –
Final Rating: 9.7